Building Your PC from Scratch: A Step-by-Step Guide
Introduction:
Building your own computer can be an exciting and rewarding experience. Not only do you get to choose all the components to fit your needs and budget, but you also get the satisfaction of putting it all together yourself. In this guide, we will go over each step involved in building a computer from start to finish. Whether you’re a seasoned builder or a beginner, we will provide all the information you need to make your build a success.
Step 1: Choosing Components
The first step in building a computer is selecting the right components. This can be a daunting task, especially if you’re new to building computers, but don’t worry! We will help guide you through this process.
Before you start picking parts, you need to define your build. Consider what you will use your computer for. Are you planning on gaming, content creation, or using it as a network attached storage (NAS) device? Different tasks will require different components, so it’s important to figure this out first.
Once you have determined what you will use your computer for, you can start considering the form factor. The most common form factors are ATX, Micro-ATX, and Mini-ITX. Each of these form factors has different dimensions and limitations, so it’s important to choose the right one for your needs.
Another important factor to consider is your budget. Building a computer can be expensive, so it’s important to set a budget and stick to it. This will help you make informed decisions about which components to buy and which to skip.
After you have defined your build, you can start picking components. The most important parts to consider are the CPU, GPU, motherboard, RAM, solid state drives, coolers, power supply, case, fans, and storage. We will go over each of these components in more detail later in the guide, but for now, just know that each of these components will play a crucial role in your build.
Now that you have a general understanding of what you need to consider when picking parts, it’s time to start shopping! Remember, take your time and don’t be afraid to ask for help. With the right components, you’ll be well on your way to building a great computer.
Step 2: Preparing Your Workspace
Once you have all the components you need, it’s time to set up your work area. A clean, well-lit, and clutter-free work area is essential for a successful build. Here are a few things you need to keep in mind when setting up your work area:
- Static Safety: Before you start handling any components, make sure you’re wearing an anti-static wrist strap. This will help prevent any static electricity from damaging the sensitive components inside your computer.
- Clear Space: Make sure you have a clear and flat surface to work on. This will make it easier to keep track of all the screws, standoffs, and other small parts that you will need.
- Good Lighting: Make sure your work area is well-lit so you can see what you’re doing. A bright LED light or a desk lamp can be helpful.
- Tools & Supplies: Have all the tools and supplies you need within reach. This includes screwdrivers, pliers, tweezers, thermal paste, and any other supplies you may need for your build.
By following these tips, you can ensure that your work area is set up for success and that you have everything you need to get started. In the next step, we will start installing the components, so make sure you’re ready!
Step 3: Installing the CPU & Motherboard
Now it’s time to install the CPU and the motherboard. Here are the steps to follow:
- Inspecting LGA Pins: If you’re using an LGA (Land Grid Array) socket, inspect the pins on the socket to make sure they’re all straight and not bent. Bent pins can cause damage to the CPU and prevent it from functioning properly.
- Installing the CPU (LGA): For an LGA socket, align the CPU with the socket and gently lower it into place. Be sure to handle the CPU by the edges to avoid damaging the pins. Once the CPU is in place, secure it by locking the socket’s lever.
- Installing the CPU (PGA): For a PGA (Pin Grid Array) socket, align the pins on the CPU with the holes in the socket and gently insert the CPU into place. Be sure to handle the CPU by the edges to avoid damaging the pins.
- Installing the CPU (HEDT/Servers): For a HEDT (High-End Desktop) or server socket, follow the manufacturer’s instructions for installing the CPU. This type of socket may require a special tool to secure the CPU into place.
- Installing the Motherboard: Place the motherboard on the standoffs in the case and secure it with screws. Make sure the standoffs are in the correct positions for your motherboard and that the screws are tightened securely.
By following these steps, you’ll have the CPU and motherboard installed and ready for the next steps in the build process. In the next step, we’ll be installing the memory.
Step 4: Adding Memory
Installing the memory is a straightforward process. Here’s what you need to do:
- Installation Procedure: Open the memory slots on the motherboard and align the memory modules with the slots. Gently insert the modules into the slots, making sure they click into place. Repeat the process for all the memory modules you want to install.
- Arrangements: If you’re installing multiple memory modules, it’s important to follow the recommended arrangement for your motherboard. This information can usually be found in the motherboard manual. The most common arrangements are single-channel or dual-channel. For dual-channel, you’ll need to install the modules in pairs and in the correct slots, as indicated in the manual.
By following these steps, you’ll have your memory installed and ready for use. In the next step, we’ll be installing the M.2 SSD.
Step 5: Installing the SSD
In this step, we’ll be installing the M.2 SSD, which is a type of solid-state drive that provides fast storage for your system. Here are the steps to follow:
- Installation Procedure: Locate the M.2 slot on the motherboard and insert the SSD into the slot, making sure it clicks into place. Secure it with the screw provided or as indicated in the motherboard manual.
- Cooler Considerations: If you’re using a high-performance M.2 SSD, you may want to consider installing a heatsink to keep the drive cool. Some motherboards have built-in M.2 heatsinks, while others may require an aftermarket heatsink to be installed.
- Air Mount Setup (Consumer Sockets): If you’re using an air cooler, you’ll need to mount it to the CPU. Follow the instructions for your specific cooler to make sure it’s installed correctly. Apply thermal compound to the CPU as instructed by the cooler manufacturer.
Step 6: Cooling Setup
In this step, we’ll be installing the cooler to keep your CPU running at optimal temperatures. Here’s what you need to do:
- Air Mount Setup (Consumer Sockets): If you’re using an air cooler, you’ll need to mount it to the CPU. Follow the instructions for your specific cooler to make sure it’s installed correctly. Apply thermal compound to the CPU as instructed by the cooler manufacturer.
- Air Mount Setup (HEDT/Servers): If you’re building a high-end desktop or server system, you may be using a specialized cooler that’s different from consumer sockets. Follow the instructions for your specific cooler to ensure proper installation.
- Thermal Compound Application (Consumer Sockets): After mounting the air cooler, apply thermal compound to the CPU as instructed by the cooler manufacturer. This will help transfer heat from the CPU to the cooler more effectively.
- Thermal Compound Application (HEDT/Servers): If you’re using a specialized cooler for a high-end desktop or server system, follow the instructions for the thermal compound application.
- Mounting Air Coolers: Mount the air cooler to the CPU and secure it with the provided screws. Connect the cooler’s fan to the CPU fan header on the motherboard.
- Pre-Build Test Liquid Mount Setup: If you’re using a liquid cooler, it’s a good idea to perform a pre-build test setup to make sure everything is working correctly. Follow the instructions for your specific cooler to ensure a successful pre-build test setup.
Step 7: Powering on and Testing
Before fully assembling your PC, it’s important to do a pre-build test setup to make sure everything is working correctly. Here’s what you need to do:
- First Power Up: Connect the power supply to the wall outlet and turn it on. Press the power button on your motherboard to turn on your PC. Observe the POST (power-on self-test) process, which should be indicated by beeps and messages on your screen.
- Bench Troubleshooting: If you encounter any problems during the POST process, such as beep codes or error messages, use the manual for your motherboard to troubleshoot the issue. Check the connections of your components and make sure they are securely connected.
- Check the Fans: Make sure all fans are running and not making any unusual noises. This will ensure proper cooling and prevent damage to your components.
By performing this pre-build test setup, you can identify and resolve any issues before fully assembling your PC, saving you time and potential headaches down the road.
Step 8: Preparing your PC Case
Before installing your motherboard and other components, you need to prepare your case for the build. Here’s what you need to do:
- Motherboard Standoffs: Check your case to see if it has pre-installed standoffs, or screw holes, for mounting the motherboard. If not, install the standoffs that came with your motherboard. Make sure they are positioned correctly to match up with the screw holes on your motherboard.
- Cable Management: Take a look at the cable management options in your case and start thinking about how you’ll route your cables to ensure good airflow and a neat appearance. You can also consider purchasing cable ties, Velcro straps, or other cable management tools to help keep your build organized.
By preparing your case, you’ll create a solid foundation for the rest of your build, making it easier and more efficient to install your components.
Step 9: Motherboard Installation
Now it’s time to install your motherboard in your case. Here’s what you need to do:
- Front Panel Header: Locate the front panel header on your motherboard and connect the front panel cables from your case, including the power and reset switches, the HDD LED, and the power LED. Consult your motherboard manual to make sure you connect these cables correctly.
- Front I/O (Audio): Connect the front panel audio cable to the appropriate header on your motherboard, typically marked as “HD Audio.”
- Front I/O (USB 2.0): Connect the USB 2.0 cable to the appropriate header on your motherboard.
- Front I/O (USB 3.x): Connect the USB 3.x cable to the appropriate header on your motherboard.
- “Front” I/O (Legacy): If your case has any legacy ports, such as a parallel or serial port, connect them to the appropriate header on your motherboard.
With your front panel cables connected, you can now mount your motherboard in your case using the standoffs and screws you installed in step 8. Make sure the screws are tightened securely, but not over-tightened, to prevent damaging your motherboard.
Step 10: Connecting Storage Devices
It’s time to install your storage devices. Here’s what you need to do:
- SATA Data Cables: Connect your SATA data cables to the SATA ports on your motherboard and to your storage devices, whether they be 2.5-inch or 3.5-inch hard drives or solid-state drives. Make sure the cables are securely connected and properly seated.
- Mounting: Depending on your case, you may need to mount your storage devices using screws or drive trays. If you’re using drive trays, insert your storage devices and secure them in place with screws. If your case doesn’t have drive trays, you can simply screw your storage devices directly into the case.
By installing your storage devices, you’re now able to store your operating system, applications, and data. This is an important step in building your PC, as storage is where all of your data will live.
Step 11: Installing Cooling and Fans
In this step, we will be installing the fans and setting up the cooling system for your PC build.
- Radiator setup & mounting: If you’re using a liquid cooler, the first step is to mount the radiator to the case. This can be done using screws or mounting brackets, depending on your case and cooler.
- Fan control & power distribution: Once your radiator is installed, you need to connect your fans to the fan headers on your motherboard. You can also use a fan controller or splitter to control the speed and power distribution of your fans. Make sure your fans are connected to the correct headers and are properly powered.
By setting up your cooling system, you’ll be able to keep your PC running at a stable temperature, even under heavy load. Good cooling is important to prevent overheating and to ensure that your PC runs smoothly and reliably.
Step 12: Installing the Power Supply
In this step, you’ll be installing the power supply and wiring it up to your PC components.
- Mounting to the case: The first step is to mount the power supply to the case. This can be done using screws or a bracket, depending on your case.
- Wiring: Once the power supply is mounted, you need to connect the cables to your components. You should start with the 24-pin motherboard power cable, followed by any other cables for components such as graphics cards, hard drives, and fans. Make sure that the cables are properly seated and secured, and that there’s no damage to the connectors or cables.
By installing the power supply and wiring it up, you’ll be able to provide power to all of the components in your PC. A good power supply is important to ensure stable and reliable operation of your PC.
Step 13: Adding a Graphics Card
In this step, you’ll be installing the graphics card, which is a critical component for gaming and other demanding tasks.
- Other cards & anti-sag: If you have multiple graphics cards, you should install them first and make sure they’re securely mounted. If you’re using a heavy graphics card, you may need to use anti-sag brackets to prevent it from sagging and putting stress on the PCIe slot.
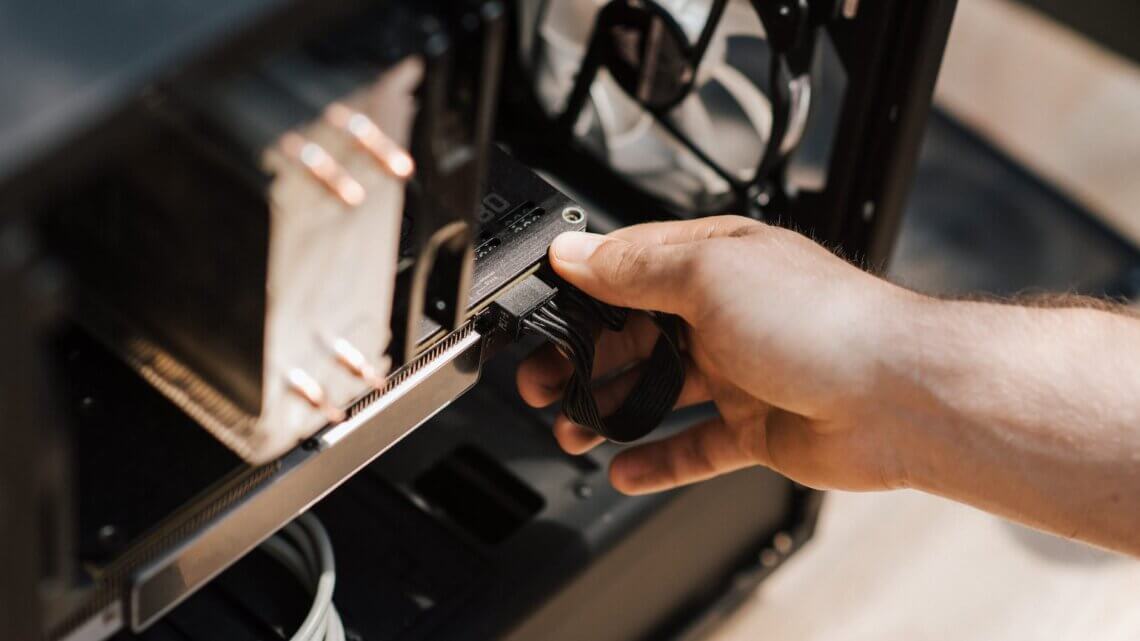
- Power: After you have your graphics card(s) installed, you need to connect the power cables to them. Most graphics cards require one or two 8-pin or 6-pin power connectors. Make sure you have enough power to run your graphics card and connect the cables correctly.
By installing the graphics card, you’ll be able to enjoy high-quality graphics and improved performance for gaming and other demanding tasks. Having a powerful graphics card is essential for a good gaming experience and for content creation.
Step 14: Tidying Up & Cable Management
In this step, you’ll be tidying up the interior of your PC by organizing and securing the cables. Good cable management can improve the appearance of your build, improve airflow, and make it easier to work on your PC in the future.
- Organize: Start by organizing the cables so they’re not crossing each other and blocking air flow. Use cable ties, velcro straps, or cable combs to secure the cables and prevent them from getting tangled.
- Route: Make sure that the cables are routed through the cable management channels, grommets, or tie-downs in your case. This will help to keep the cables neat and tidy, and prevent them from blocking the airflow.
- Secure: Finally, make sure that the cables are securely attached to the case and that there’s no slack that could get caught on other components.
By taking the time to organize and secure your cables, you’ll have a neat and tidy interior that’s easy to work on and looks great. Good cable management can also help to improve airflow and cooling in your PC, which is important for stability and longevity.
Step 15: Finalizing & Troubleshooting
Once all the components are installed and wired, it is time to power on the system. With the power supply plugged in, press and hold the power button for a few seconds. When the system turns on, the BIOS or UEFI should appear. Depending on the version of the BIOS, this may look different. However, the goal is to ensure the system boots correctly. If the system does not boot, then it is time to troubleshoot the issue and identify the source of the problem.
Conclusion and enjoying your new PC:
Congratulations! You have now successfully built your very own custom PC. It’s time to sit back and admire your work. This build process can seem daunting at first, but with the right approach, it can be an enjoyable and fulfilling experience.
Take some time to ensure everything is working as expected and make any necessary adjustments. Installing the operating system, drivers, and software of your choice will be the final step in bringing your PC to life.
Don’t forget to keep your system updated, regularly clean it, and take care of it to ensure it runs smoothly for many years to come.
Building your own PC has many benefits, including having a system that’s tailored to your specific needs, cost savings, and the satisfaction of having built something yourself. Enjoy your new machine, and happy computing!